TPM Spoofing Guide
Required items
- USB flash drive (8GB or larger recommended, all data will be erased)
- Ventoy installer
1. Install Ventoy
1.1 Download Ventoy
- Go to the Ventoy official site.
- Download the installer for your operating system.
- Windows:
ventoy-x.x.xx-windows.zip - Linux:
ventoy-x.x.xx-linux.tar.gz
- Windows:
- Extract the downloaded archive.
1.2 Install Ventoy on USB
Caution
Installing Ventoy will erase all data on the USB. Back up important data beforehand.
- Connect the USB flash drive to your PC.
- Run
Ventoy2Disk.exe(Windows) from the extracted folder. - In the Device field, make sure the correct USB to install is selected.
- Click the Install button.
- If a warning message appears, click Yes to proceed with the installation.
- When installation is complete, a
Ventoydisk will be created on the USB.
2. Add the Designated ISO
- Open the installed USB (
Ventoyvolume) with File Explorer. -
Copy the tpm.iso file to the root directory (top-level folder) of the USB.
Example)
usb:\tpm.iso
3. Initialize the TPM
Before booting, initialize the TPM (Trusted Platform Module).
Caution
Initializing the TPM will erase all encryption keys and authentication data stored in the TPM. If you use disk encryption such as BitLocker, back up your recovery key beforehand.
1. Open the TPM Management Console
- Press
Windows+Ron the keyboard to open the Run dialog. -
Type
tpm.mscin the input field and pressEnter. -
The Trusted Platform Module (TPM) Management console will open.
2. Clear TPM
- In the Actions panel on the right side of the console, click Clear TPM....
- If a confirmation window appears, follow the instructions.
Note
Depending on the language, the menu may appear as Clear TPM....
3. Reboot and Verify
- Selecting Clear TPM will require a reboot of the system.
- Wait for the automatic reboot or reboot manually right away.
- Proceed to step 4 to change the boot order immediately.
Caution
If you could not proceed to step 4 immediately during reboot and booted into Windows, perform the TPM initialization in step 3 again.
4. Boot from USB
Change the boot order so the target PC boots from the USB first.
- Connect the USB containing the ISO to the target PC.
- Turn on the PC and repeatedly press the boot order shortcut key right after powering on.
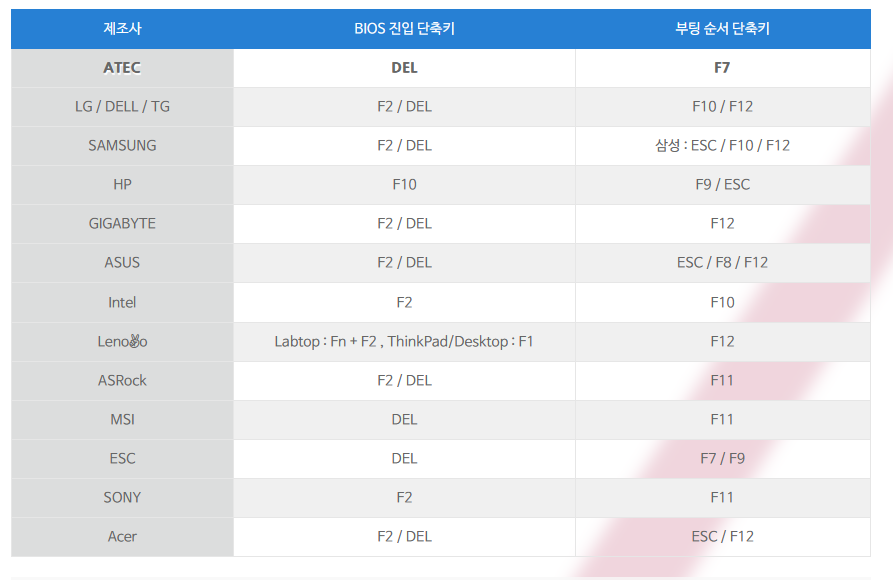
- Boot through the USB partition, not
Windows Manager.
5. Boot and Proceed
5.1 Ventoy Boot
- After changing the boot order and restarting the PC, the Ventoy menu will appear.
- Use the arrow keys (↑/↓) to select the designated ISO you copied earlier and press
Enter. - Select
Normalfor the boot method and pressEnter. - ISO boot will begin.
5.2 Enter Key
When booting is complete, the license entry screen will appear.
- When the license input field appears, enter your Tophel license key.
- Press
Enterto confirm.
Note
The key may be case-sensitive, so enter it exactly.
5.3 Change the Custom TPM Unique ID
-
First number: enter a number within the specified range and press
Enter.Select first number [1~N]: (a number between 1~N) -
Second number: similarly, enter a number within the specified range and press
Enter.Select second number [1~N]: (a number between 1~N)
Caution
- You must enter a number within the specified range.
- Out of range, an error may occur or it may ask you to enter again.
Note
The maximum number of TPM unique ID changes is (first number N) X (second number N), since it changes by the combination of the first and second numbers. For additional changes, you must enter a different number than before.
6. Complete
When all inputs are complete, the installation/setup process will proceed automatically.
Complete
- When
okand✓ Doneare displayed on the screen, the task is complete. - If these messages are not displayed, please try again.
Troubleshooting
| Symptom | Solution |
|---|---|
| ISO not in the list | Verify the ISO was copied correctly to the USB root |
| License rejected | Check case and typos, and check your internet |
| Number input error | Make sure the number is within the specified range |
| USB not recognized | Try connecting to another USB port |